Windows:
Often requested log files.
There are different log files that might be required for a successful investigation.
- debug log - contains general information about the events taking place and the softphone configuration.
- packet capture log - contains information about the network packets sent to and by the softphone.
- dump file - creates a dump in case Zoiper's interface froze.
- crash log- contains valuable information in case Zoiper crashed in the middle of an action.
- Other log files, that are not listed here, may also be requested by our Support team.
Usually a packet capture file is always requested along with a debug log file.
Note: Before preparing a set of log files, make sure that all non-strictly required settings such as STUN, Rport, KPML, MWI, Presence, etc. are disabled.
Debug log
A debug log is created only if the debug logger is ON. It contains detailed information about the events that took place, such as account registration, network status, configuration status, etc. It is usually required by our developers for their investigation.
Turn ON the debug logger by using the Settings window:
- Open the Settings window by clicking the button on the main Zoiper screen and Help/About -> Diagnostic;
- Click on Enable debug log;
- click on the checkbox to activate the Debug logger;
- press "close" or "back" to go back and save the changes;
- now exit the softphone and then start it again to create the log file.
Now the debug logger is ON.
A file named logfile_XXXXX_YYYYY.txt will be created in the `Application Data\Zoiper5` folder for the currently logged user. It is `C:\Program Data` for some Windows flavors.
XXXXXX is date and YYYYYY is time.
How to access it?
- Open the Windows File explorer;
- type %APPDATA% in the addressbar
- hit the Enter key.
- Then open the folder named Zoiper5 and locate the log file.
When the issue is recreated, please exit Zoiper to make sure that the log contains only relevant information.
If you do not need the debug logger ON, you can disable it by using the Settings -> Help/About -> Diagnostic -> Enable Debug log window.
Packet capture log
A packet capture log file is required so our developers could follow the network packets sent and received by Zoiper.
The capture contains information about account registrations, configuration details, etc.
To create the packet capture file you could use an application like Wireshark.
Wireshark is a useful tool for taking packet captures and network monitoring.
You can download it here:
http://www.wireshark.org/download.html
Wireshark documentation is available here:
http://www.wireshark.org/docs/
Here is our basic PDF tutorial about how to make a packet capture.
Make sure Zoiper is not running, then start Wireshark, select the currently active network interface and start capturing.
Then start Zoiper and recreate the issue.
When done, exit Zoiper, then stop capturing and save the capture as a file.
Send this file to us along with a debug log file from the same session.
Dump file
A dump file would provide valuable information in case Zoiper froze in the middle of an action.
Right click on the Windows taskbar -> Task manager -> select Processes -> More details;
Right click on Zoiper, then select "Create dump file".
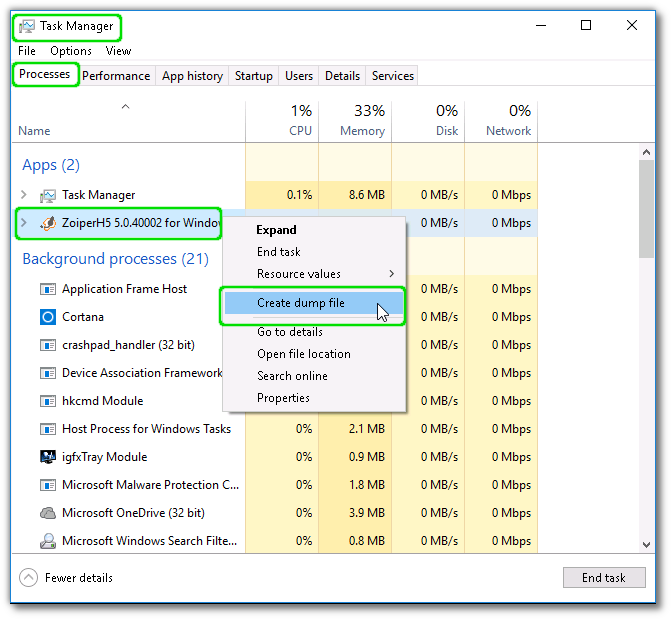
After the file is created you will need to save it to a safe location.
Crash log
A crash log is usually created automatically.
It is located in the ` %localappdata%\Zoiper5\User Data\Crashpad\reports\ ` folder for the user that started Zoiper.
Open a file browser, type %localappdata% in the address bar, press Enter, then find the `Zoiper5\User Data\Crashpad\reports` folder.
Note that you will need to attach the file to your email as a plain attachment or in a zip archive. Copy pasting it will ruin its contents.
If the files are too large to be sent by email, upload them to your dropbox / googledrive / cloud account and send the download link to our support team.
Linux:
Often requested log files:
There are different log files that might be required for a successful investigation.
- debug log - contains general information about the events taking place and the softphone configuration.
- packet capture log - contains information about the network packets sent to and by the softphone.
- strace - contains very useful information in case Zoiper behaved unexpectedly.
- crash log - contains valuable information in case Zoiper crashed in the middle of an action.
- Other log files, that are not listed here, may also be requested by our Support team.
Usually a packet capture file is always requested along with a debug log file.
Note: Before preparing a set of log files, make sure that all non-strictly required settings such as STUN, Rport, KPML, MWI, Presence, etc. are disabled for the affected account.
Debug log
A debug log is created only if the debug logger is ON. It contains detailed information about the events that took place, such as account registration, network status, configuration status, etc. It is usually required by our developers for their investigation.
Turn ON the debug logger by using the Settings window:
- Open the Settings window by clicking the button on the main Zoiper screen and Help/About;
- Click on Enable debug log;
- click on the checkbox to activate the Debug logger;
- press "close" or "back" to go back and save the changes;
- now exit the softphone and then start it again to create the log file.
Now the debug logger is ON.
A file named logfile_XXXXX_YYYYY.txt will be created in the home folder for the currently logged linux user.
XXXXXX is date and YYYYYY is time.
You can access it by opening the a File explorer (thunar, nautilus, konqueror) and opening your home folder. Then locate the log file.
When the issue is recreated, exit Zoiper to make sure that the log contains only relevant information.
If you do not need the debug logger ON, you can disable it by using the Settings window -> Help/About -> Click on Enable debug log and turn off the debug logger.
Packet capture log
A packet capture log file is required so our developers could follow the network packets sent and received by Zoiper.
The capture contains information about account registrations, configuration details, etc.
You could either use an application like Wireshark or run the tcpdump command in the terminal.
a) Creating a packet capture file by using Wireshark
Wireshark is a useful tool for taking packet captures and network monitoring.
You can download it here:
http://www.wireshark.org/download.html
Wireshark documentation is available here:
http://www.wireshark.org/docs/
Here is our basic PDF tutorial about how to make a packet capture:
Note that Wireshark requires to be started as super user in order to capture the interface, or follow the Wireshark manual about how to allow unprivileged users to do it instead.
Make sure Zoiper is not running, start Wireshark, select the currently active network interface and start capturing.
Then run Zoiper and recreate the issue.
When done exit Zoiper, then stop capturing and save the capture as a file.
b) Creating a packet capture by using tcpdump in the terminal
Start your favorite terminal emulator and issue the tcpdump command:
sudo tcpdump -i ethX -n -l -s 1500 -w zoiper.cap
Replace <ethX> with the network adapter which you use to access the Internet.
If you do not know which one it is, use the ifconfig command.
In the Terminal press Ctrl+c or use backspace to make sure there is nothing else on the line, then type
sudo ifconfig
and press Enter. You will need to enter your password, then you will see the list of your network adapters.
Ethernet (cable) is eth0,1,2,3 and wi-fi adapters are wlan0,1,2,.. etc.
Once the tcpdump command is running, start Zoiper.
Recreate the issue, then exit Zoiper and stop the packet capture - go back to the terminal and press Ctrl+c.
The packet capture will be located in the directory where you issued the 'tcpdump' command.
Send this file to us along with a debug log file from the same session.
Strace
In some cases an strace contains very useful information in case Zoiper behaved or exited unexpectedly.
To create the strace you will first need to gain admin access. Run a terminal, type
sudo su
and press Enter. Enter your password. This will let you operate as superuser.
Now use the cd command to navigate to the folder where your Zoiper
executable file is located. By default Zoiper 5 is located in /usr/bin/ , so you will need to execute:
cd /usr/bin/
Once you are in the folder where your Zoiper executable file is located, start it using the following command:
strace -s 1024 -o zoiper_strace.txt -f ./zoiper
Hint: use the TAB key to auto-complete the name of the Zoiper executable.
press Enter to run the command, then try to recreate the issue.
When the issue is recreated, exit your Zoiper and send us the zoiper_strace.txt file.
Crash Log
A crash log is usually created automatically.
It is located in the `~/.Zoiper5/reports folder`.
Open a file browser -> Go to location -> type `~/.Zoiper5/ `and find the reports folder.
Note that you will need to attach the file(s) to your email as a plain attachment or in a zip archive.
Copy / pasting will ruin the contents.
If the files are too large to be sent by email, upload them to your dropbox / googledrive / cloud account and send the download link to our support team.
Mac:
Often requested log files:
There are different log files that might be required for a successful investigation.
- debug log - contains general information about the events taking place and the softphone configuration.
- packet capture log - contains information about the network packets sent to and by the softphone.
- crash log - contains valuable information in case Zoiper crashed in the middle of an action.
- Other log files, that are not listed here, may also be requested by our Support team.
Usually a packet capture file is always requested along with a debug log file.
Note: Before preparing a set of log files, make sure that all non-strictly required settings for your account, such as STUN, Rport, KPML, MWI, Presence, etc., are disabled.
Debug log
A debug log is created only if the debug logger is ON. It contains detailed information about the events that took place, such as account registration, network status, configuration status, etc. It is usually required by our developers for their investigation.
Turn ON the debug logger by using the Settings window:
- Open the Settings window by clicking the button on the main Zoiper screen and Help/About;
- Click on Enable debug log;
- click on the checkbox to activate the Debug logger;
- press "close" or "back" to go back and save the changes;
- now exit the softphone and then start it again to create the log file.
Now the debug logger is ON.
A file named logfile_XXXXX_YYYYY.txt will be created in the `~/Library/Zoiper5` folder for the currently logged mac user. XXXXXX is date and YYYYYY is time.
In recent versions of Mac OS X `~/Library` is not visible in "Finder" - the file browser of Mac OS X.
Here are the steps to get the file(s):
1) Open a Terminal application:
`/Applications / Utilities / Terminal`
type:
open `~/Library`
OR:
In Finder hit "Shift + CMD + G" and type `~/Library` (without the quotes)
Now find the Zoiper5 Folder.
When the issue is recreated, please exit Zoiper to make sure that the log contains only relevant information.
If you do not need the debug logger ON, you can disable it by using the Settings -> Help/About -> Enable Debug log window.
Packet capture log
A packet capture log file is required so our developers could follow the network packets sent and received by Zoiper.
The capture contains information about account registrations, configuration details, etc.
To create the packet capture file you will need to use tcpdump command in the terminal.
Start your favorite terminal emulator and issue the tcpdump command:
sudo su
(You will need to enter your password. This will grant you super user privileges.)
tcpdump -i en0 -n -s 1500 -l -w zoiper.cap
(This will start capturing the network traffic.)
You will need to replace <en0> with your network adapter which you use to access the Internet, or use ifconfig to see which one is it.In the Terminal press Ctrl+c or use backspace to make sure there is nothing else on the line, then type:sudo ifconfigand press enter. You will need to enter your password, then you will see the list of your network adapters.If you are using an ethernet adapter (cable) it is en0 by default. The wi-fi adapter would be en1.
Once the tcpdump command is running, start Zoiper.
Recreate the issue, then exit Zoiper and stop the packet capture - go back to the terminal and press Ctrl+c.
The packet capture will be located in the directory where you issued the 'tcpdump' command.
Send this file to us along with a debug log file from the same session.
Crash log
A crash log is usually created automatically.
It is stored in the `~/library/Zoiper5/completed` folder.
In Finder hit "Shift + CMD + G" and type `~/library` (without the quotes) and confirm your choice. Open Zoiper5 -> reports.
Note that you will need to attach the file(s) to your email as a plain attachment or in a zip archive.
Copy / pasting will ruin the contents.
If the files are too large to be sent by email, upload them to your dropbox / googledrive / cloud account and send the download link to our support team.