Setting up Zoiper to retrieve contacts from an LDAP server
Setting up the LDAP server
The example setup steps below show how to set up an OpenLDAP server on Ubuntu 12.04 LTS.
The steps use examples from Ubuntu's help pages at:
https://help.ubuntu.com/12.04/serverguide/openldap-server.html
Steps and configuration files on other Linux distributions and/or OSes may differ.
This tutorial is NOT a detailed guide for LDAP server administration. It shows only the steps necessary to make an OpenLDAP server available for requests by Zoiper.
The domain name used in the steps below is:
example.com
Feel free to use your own domain name.
Install slapd and ldap-utils
Temporarily change /etc/hosts.
Edit /etc/hosts and comment out all entries of loopback
addresses (this change is temporary).
Example:
127.0.0.1 localhost
becomes:
#127.0.0.1 localhost
Then add:
127.0.1.1 hostname.example.com hostname
Save /etc/hosts
Install the OpenLDAP utilities:
sudo apt-get install slapd ldap-utils
Then run:
dpkg-reconfigure slapd
In the next steps provide the following answers:
Revert the changes you made to /etc/hosts.
Extend the schema 'inetOrgPerson' with 'inetOrgPersonExtended'
Now we need to add custom fields to the contacts which will be available in the LDAP server
(for example the xmpp field).
(For additional information on adding new LDAP schemas you may refer to: http://www.yolinux.com/TUTORIALS/LinuxTutorialLDAP-DefineObjectsAndAttributes.html)>
Create the following text file:
/etc/ldap/schema/inetorgpersonextended.schema
Edit it /etc/ldap/schema/inetorgpersonextended.schema and add the following content to it:
attributetype ( 1.3.6.1.4.1.4203.666.1.201
    NAME 'xmpp'
    SYNTAX 1.3.6.1.4.1.1466.115.121.1.15{1024}
    )

objectClass     ( 1.3.6.1.4.1.4203.666.1.200
    NAME 'inetOrgPersonExtended'
    DESC 'X-Person'
    SUP inetOrgPerson
    STRUCTURAL
    MAY  ( xmpp )
    )
The next steps will require creating some temporary files and folders.
You might want to create a temporary directory and move to it, before you proceed:
mkdir /tmp/tempdir
cd /tmp/tempdir
Create the directory ldif_output:
mkdir ldif_output
Create the text file schema_convert.conf.
Add the following lines to schema_convert.conf:
include /etc/ldap/schema/core.schema
include /etc/ldap/schema/collective.schema
include /etc/ldap/schema/cosine.schema
include /etc/ldap/schema/duaconf.schema
include /etc/ldap/schema/dyngroup.schema
include /etc/ldap/schema/inetorgperson.schema
include /etc/ldap/schema/java.schema
include /etc/ldap/schema/misc.schema
include /etc/ldap/schema/nis.schema
include /etc/ldap/schema/openldap.schema
include /etc/ldap/schema/ppolicy.schema
include /etc/ldap/schema/ldapns.schema
include /etc/ldap/schema/pmi.schema
include /etc/ldap/schema/inetorgpersonextended.schema
The lines above should include all .schema files, present in the
/etc/ldap/schema/ folder.
Now run:
slapcat -f schema_convert.conf -F ldif_output -n 0 | grep -i inetorgpersonextended,cn=schema
The output will be similar to:
dn: cn={13}inetorgpersonextended,cn=schema,cn=config
In the output above, the value in the curly brackets ( "{xx}" ) might differ. In our examples it is 13, but you need to REPLACE it with your actual value.
Run:
slapcat -f schema_convert.conf -F ldif_output -n0 -H ldap:///cn={13}inetorgpersonextended,cn=schema,cn=config -l cn=inetorgpersonextended.ldif
Now the local file cn=inetorgpersonextended.ldif will contain text similar to:
dn: cn={13}inetorgpersonextended,cn=schema,cn=config
objectClass: olcSchemaConfig
cn: {13}inetorgpersonextended
olcAttributeTypes: {0}( 1.3.6.1.4.1.4203.666.1.201 NAME 'xmpp' SYNTAX 1.3.6.1.
4.1.1466.115.121.1.15{1024} )
olcObjectClasses: {0}( 1.3.6.1.4.1.4203.666.1.200 NAME 'inetOrgPersonExtended'
DESC 'X-Person' SUP inetOrgPerson STRUCTURAL MAY xmpp )
structuralObjectClass: olcSchemaConfig
entryUUID: fb03a97a-ce87-1031-9a54-f3ffd1dbccf7
creatorsName: cn=config
createTimestamp: 20121129154836Z
entryCSN: 20121129154836.092140Z#000000#000#000000
modifiersName: cn=config
modifyTimestamp: 20121129154836Z
Open the file cn=inetorgpersonextended.ldif
vim cn\=inetorgpersonextended.ldif
and delete everything from the line
structuralObjectClass: olcSchemaConfig
below (including the line) to the result:
dn: cn={13}inetorgpersonextended,cn=schema,cn=config
objectClass: olcSchemaConfig
cn: {13}inetorgpersonextended
olcAttributeTypes: {0}( 1.3.6.1.4.1.4203.666.1.201 NAME 'xmpp' SYNTAX 1.3.6.1.
4.1.1466.115.121.1.15{1024} )
olcObjectClasses: {0}( 1.3.6.1.4.1.4203.666.1.200 NAME 'inetOrgPersonExtended'
DESC 'X-Person' SUP inetOrgPerson STRUCTURAL MAY xmpp )
Finally to add the schema to the OpenLDAP configuration run:
sudo ldapadd -Q -Y EXTERNAL -H ldapi:/// -f cn\=inetorgpersonextended.ldif
Run the following command to confirm the new schema got added:
sudo ldapsearch -Q -LLL -Y EXTERNAL -H ldapi:/// -b cn=schema,cn=config dn
The output should be similar to:
dn: cn=schema,cn=config

dn: cn={0}core,cn=schema,cn=config

dn: cn={1}cosine,cn=schema,cn=config

dn: cn={2}nis,cn=schema,cn=config

dn: cn={3}inetorgperson,cn=schema,cn=config

dn: cn={4}inetorgpersonextended,cn=schema,cn=config
Add users
Create the file add_user.ldif and insert the followin content in it:
dn: uid=john, dc=example,dc=com
objectClass: inetOrgPersonExtended
uid: john
sn: Doe
givenName: John
cn: John Doe
displayName: John Doe
mail: john.doe@domain.com
mobile: +123456789
xmpp: xmpp:john.doe@jabber.com
Run:
ldapadd -x -D cn=admin,dc=example,dc=com -W -f add_user.ldif
The output should be:
adding new entry "uid=john, dc=example,dc=com"
Now the user John Doe should exist in your LDAP server and should be
available for queries by Zoiper.
You may add as many users as you need.
Zoiper uses the following LDAP fields:
| sn | surname |
|---|---|
| givenName | first name |
| mobile | mobile phone number |
| homePhone | home phone number |
| telephoneNumber | telephone number |
| facsimileTelephoneNumber | telephone number |
| xmpp | jabber xmpp URI ( should be in the format xmpp:user@host.com ) |
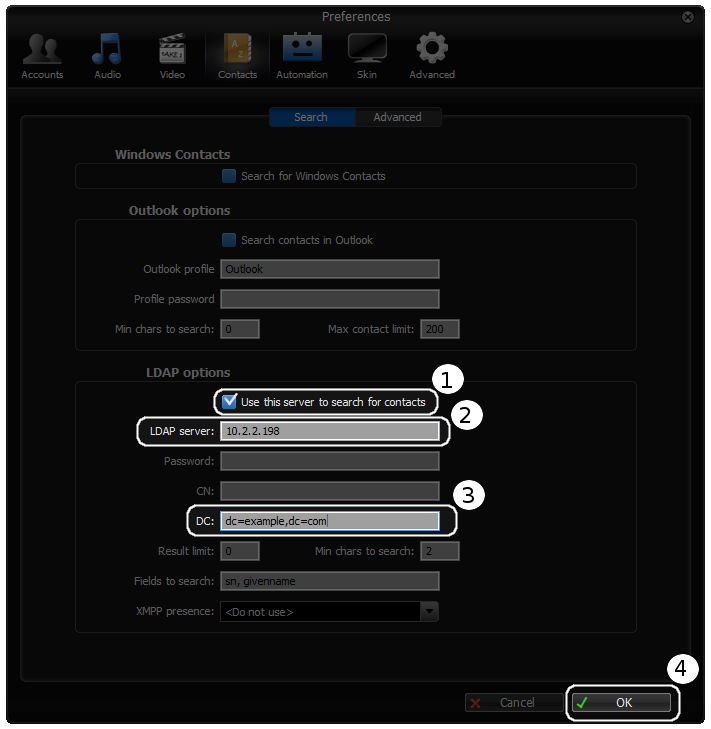
Setting up Zoiper
-
Start Zoiper
-
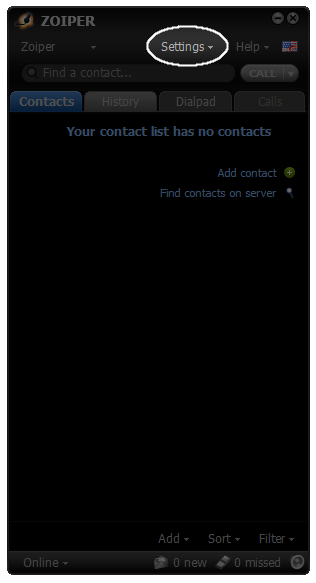
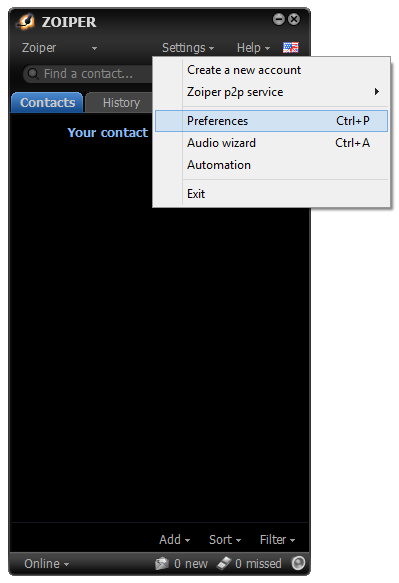
Click on Settings.
-
Choose Preferences.
-
Click on Contacts.
-
Go through the LDAP options
- In the
LDAP optionssection check the checkboxUse this server to search for contacts. - In the field
LDAP servertype in your LDAP server IP address (for example 10.2.4.43) - In the
DCfield type in:dc=example,dc=com(replace 'example' and 'com' with the correct values, if you have not used 'example.com' in the LDAP server setup ) - Click
OK.
- In the
-
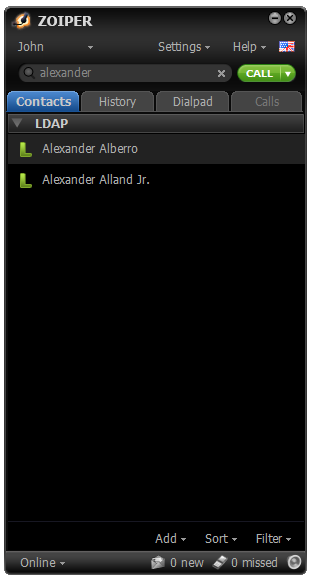
Search for a contact
- In the search bar on the top type in a name (for example 'alexander').
- All contacts in the LDAP server containing the string 'alexander' (case insensitive) in
the fields you have set up Zoiper to filter by (by default
sv,givenname) should appear.